
One of the cornerstones of the AWS Cloud is the EC2 service. Amazon EC2 (Elastic Compute Cloud) is a managed service which facilitates the launching of resizable, scalable, and secure virtual machines in the cloud. Given what EC2 achieves, it is a wildly popular service for myriad use cases such as database servers, HPC servers and web servers to name but a few.
In today’s blog post, we will take you through the step-by-step process of launching an EC2 instance, and how to launch a simple web server on which you can host a simple website.
Everything discussed in this tutorial comes under the Free Tier. However, it is important to terminate any running instances once you are finished to prevent incurring cost.
Without further ado, let’s get started.
Launch Instance
First you need to navigate to the EC2 console, and click ‘Launch Instance’, and again, ‘Launch Instance’.

Once you have selected this, you will be taken to the first step in the process of launching an EC2 instance, in which we choose our AMI.
AMI (Amazon Machine Image)
An AMI (Amazon Machine Image) is a template of sorts for all the necessary software, dependencies, and anything else you need to launch your instance. When choosing an AMI for your instance, you have the following options:
- AWS Provided AMIs – AMIs built and maintained by AWS
- Community AMIs – are AMIs built by other users of AWS for all kinds of use cases
- Marketplace AMIs – These are AMis published by independent software vendors (ISVs) which are designed to solve specific use cases. There are VPN AMIs, Machine Learning AMIs and just about every other kind of AMI that you can imagine.
For this demo, we’re choosing the ‘Amazon Linux 2 AMI’ as it is Free Tier Eligible. Once you have made the selection it will take you to your various options for instance types.
Instance Types

Instance types are various distributions of compute, memory, storage, and networking which are to be chosen based on your use case. You may for example choose an ‘inf1.24xlarge’ if you have a need for an extremely compute intensive machine learning application, or a ‘t2.micro’ if you are testing something out like we are. Once you have selected the free tier eligible t2.micro, we will select ‘Next: Configure instance details’ to be taken to the next stage of launching our instance.

This is the section where we can configure a number of properties for our instances like launching them in a particular AZ, choosing Spot capacity, deciding shutdown behavior and many other options for launching your instance.
Bootstrapping
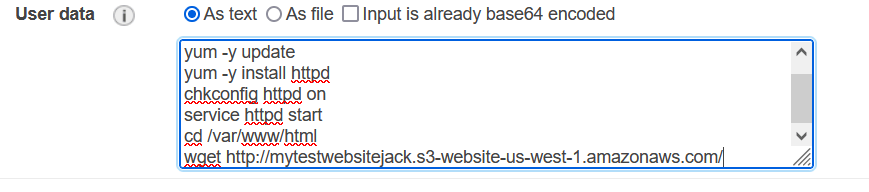
To launch our web server so that it is ready to go on launch, we will use something called ‘Bootstrapping’ to ensure that our Web Server is installed and ready to go as soon as the instance is launched. Bootstrapping is the process of running a script when the instance launches, which will install all the necessary dependencies on the server – and we do this using the ‘User Data’ section at the bottom.
For the purposes of this walkthrough, we will leave all the defaults and scroll down to the User Data section. Paste this short block of code into the text box for User Data:
#!/bin/bash -ex
yum -y update
yum -y install httpd
chkconfig httpd on
service httpd start
cd /var/www/html
wget http://mytestwebsitejack.s3-website-us-west-1.amazonaws.com/
This block of code basically updates the EC2 instance, installs a simple Apache Web Server, and saves website files which are stored on S3, which was repurposed from a previous blog post on How to Create a CV Website on Amazon S3.
This is how your User Data box should look:
This script will now run when we click ‘launch’ on the instance and get everything ready for when we try to access the page once the EC2 instance is launched.
We will skip the next two steps in the process ‘Add Storage’ and ‘Add Tags’ and go straight to the ‘Configure Security Group’ (stage 6) of the process.
Configure Security Group
The Security Group is a stateful firewall that controls traffic flow to and from the instance. In our case, as we are enabling a web server, we need to ensure both HTTP and HTTPS traffic is allowed to flow to and from our instance.
To do this, we add a new rule, and under ‘Type’ choose HTTP, and leave the default protocol and port, but change the source to ‘Anywhere’. Also, choose one more rule with the ‘Type HTTPS’ and change the source to ‘Anywhere’ also. It should look like this when you are ready.

It is worth noting that in a production environment, we would never leave SSH open if we didn’t need it (as people can access our servers) and the rules for Source IP access via the HTTP(S) protocols would be much more selective to ensure only safe and legitimate traffic is permitted. As this is a test environment, we can configure it this way for now.
Review and Launch
Then we click ‘Review and Launch’. It will take us to a final Review page, where we will receive a warning about leaving our Security Groups open to the world – which as we discussed earlier is not a problem for our use case. We will be destroying this instance soon anyway.
We then check over our options and click ‘Launch’. A dialogue box will pop up asking about a key pair. We do not need a key pair as we will not be using SSH to gain access to the instance. Simply select the ‘Proceed
Without a key pair’ option and tick the box accepting the conditions of doing so. 
Once done, click launch!
We are then redirected to a page regarding some launch information, and when scrolling down, we will see a button for ‘View instances.’
View Instances
This will take us back to the console, and after a few moments you will see your instance status change from ‘Pending’ to ‘Available’.

Once launched, select the checkbox to bring up more information about the instance, and select the public IP and paste into a new tab. After a few moments, if you follow the steps carefully a webpage will load, and you will see a surprise animal on the page – which animal is it?
Cleaning up
Once we are done, go back into the console, highlight the instance by ticking its relevant box and clicking on ‘Instance State’, and ‘Terminate ‘State’. This will ensure that you prevent costs from spiraling and prevent leaving unused compute capacity lying dormant.
Ready to Take Your Tech Career to the Next Level?
- On-Demand Training: Learn at your own pace and on your own schedule.
- Challenge Labs: Apply what you’ve learned in a real-world setting without the risk of incurring surprise cloud bills.
- Cloud Mastery Bootcamp: Build job-ready skills with this live, immersive training that can get you certified faster than you thought possible.