When setting up your custom Amazon Virtual Private Cloud (VPCs) you’ll need to specify the AWS IP ranges for your CIDR block and public and private subnets. If you don’t know how to do that, you’re in the right place as you’re about to learn exactly how to determine the ranges to use and how to set up the configuration.
If you need a basic primer on what an IP address and subnet mask is, and how DNS resolution works, check out the video below before continuing.
An Amazon VPC is a virtual network that is dedicated to your AWS account. This is logically isolated space into which you can launch AWS services such as Amazon Elastic Compute Cloud (EC2) instances.
By default, AWS create a VPC in each AWS region with only public subnets. If you want to create your own custom VPC, that’s when you need to learn how to specify the ranges of IP addresses that will be used for assigning private IP addresses to the resources you launch within the VPC.
Amazon EC2 and Amazon VPC support the IPv4 and IPv6 addressing protocols and by default, only the IPv4 protocol is configured in your default VPC. When you create your own custom VPC you must specify the IPv4 CIDR block to use. This is the overall block of private addresses from which you will then create your IP subnet ranges for your public and private subnets.
The addresses you configure for your Amazon VPC public and private subnets are created from the CIDR block and are private IP addresses. These are not routable on the Internet. You must create a block of private addresses for both private and public subnets. Amazon EC2 instances in public subnets will obtain a public IP address in addition to the private IP address.
Note: Every Amazon EC2 instance will obtain a private IP address from the IPv4 address range of the subnet that is assigned to the default network interface (eth0) of the instance. Each instance is also given a private (internal) DNS hostname that resolves to the private IP address of the instance.
What’s a CIDR block?
CIDR stands for Classless Inter-Domain Routing. This is a method through which you use variable-length subnet masking (VLSM) to use bits from the host portion of an address to create additional, smaller ranges of addresses. I won’t teach you the concepts behind CIDR in this article as it’s a lengthy subject but there are plenty of good resources just a Google search away.
When you create a custom Amazon VPC you define the IP CIDR block to use. This block of IP addresses is the overall block from which you will then create your subnets. It’s important to plan your CIDR ranges properly to avoid issues later on. For example in the following default VPC, 172.31.0.0/16 is the CIDR block.

The CIDR block above has a 16-bit prefix which is indicated by the /16 after the IP address. You can then create your subnets from this overall range. For example, in the image below you can see three IP ranges that are assigned to subnets.

These ranges have a /20 prefix which creates a range of IP addresses within the overall block of addresses. From the 172.31.0.0/16 CIDR block you can create 16 subnet blocks with /20 prefixes. Each subnet provides up to 4091 usable addresses (the first 4 and last 1 address are reserved). The subnet mask for a /20 prefix is 255.255.240.0.
As you can imagine, it’s important to determine the correct IP CIDR block based on the number of subnets you require and and the number of hosts you require per subnet.
How to determine the AWS IP Ranges to use for your Amazon VPC Subnets
AWS recommends that you specify a CIDR block (of /16 or smaller) from the private IPv4 address ranges as specified in RFC 1918. Here are the address blocks you can get started with:
- 10.0.0.0 – 10.255.255.255 (10/8 prefix)
- 172.16.0.0 – 172.31.255.255 (172.16/12 prefix)
- 192.168.0.0 – 192.168.255.255 (192.168/16 prefix)
For example, if I want to use the 10.0.0.0 network with a /16 prefix, I know that with a /16 prefix (255.255.0.0 subnet mask) the first CIDR block I can use for a VPC is 10.0.0.0/16 and the second network is 10.1.0.0/16.
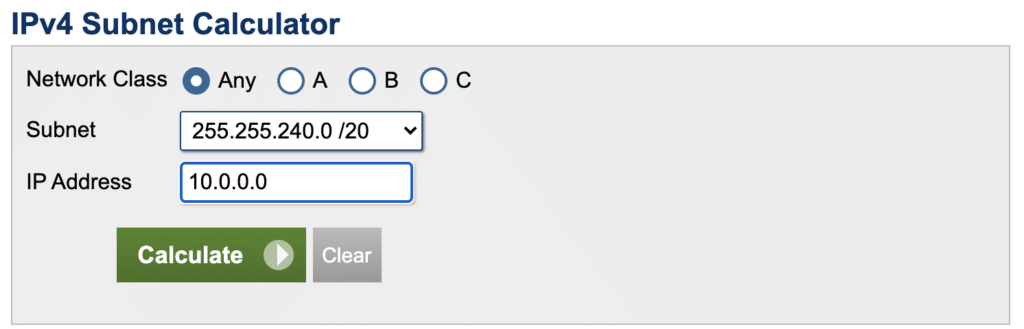
Next, let’s work out the AWS IP ranges we want to use based on the number of subnets and hosts we want to be able to create within our CIDR block. For this, I suggest using a subnet calculator. In the example below I have configured the calculator with 10.0.0.0/20:
The calculator then generates information around the subnet ranges including the subnet mask and the number of possible hosts. It also shows us the IP ranges we can use within the 16 possible networks we can use:
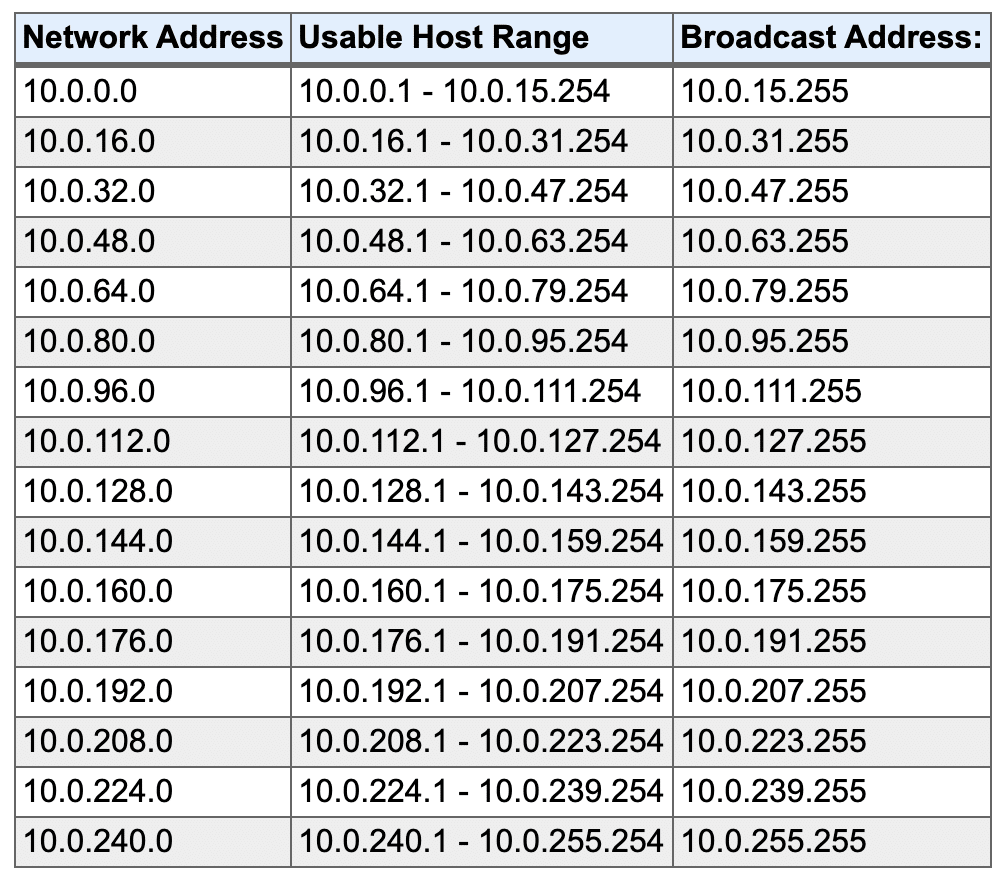
We now have 16 address ranges to use within our CIDR block and each of these IP address ranges can support a maximum of 4091 hosts. If you’re happy with that the next job is to create the VPC and subnets within the AWS management console.
Create Amazon VPC and Subnets
The first step is to create the Amazon VPC. In the AWS management console, change to the Amazon VPC console view and make sure you’ve selected the correct AWS region. Click “Create VPC” and fill out the name, and IPv4 CIDR block as in the example below:
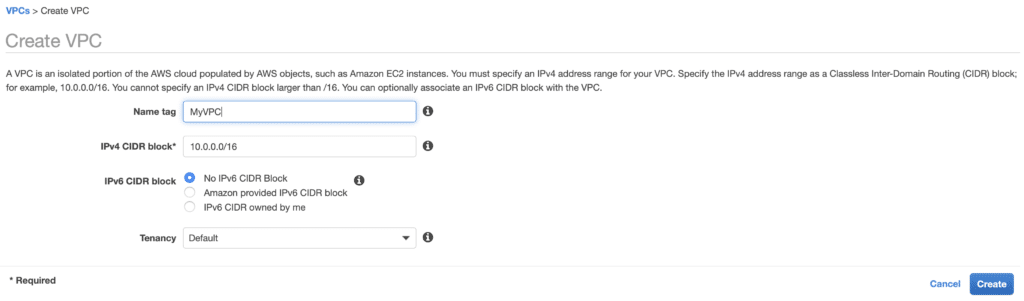
Click create and your Amazon VPC will be created for you. The wizard automatically creates some resources for you such as the Internet Gateway and main route table. However, you must then create your subnets.
Click on subnets from the left-hand panel of the AWS management console and then click “Create subnet”. Fill out the name tag, select your VPC, choose an availability zone, and specify the IPv4 address range for the subnet.
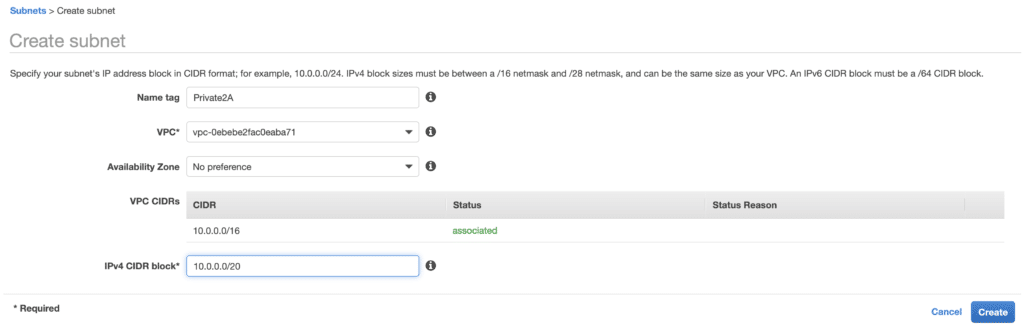
Tip: I suggest putting the availability zone number/letter in the name tag for easier identification and also specify whether this is a private or public subnet. This is useful when you’re allocating resources to IP subnets.
You can then proceed with creating additional subnets. The next addresses available, based on the table above, are 10.0.16.0/20 and 10.0.32.0/20. Use the same process as above and you should end up with the following configuration:

That’s it! You now know how to work out your AWS IP ranges and have created your custom Amazon VPC. You have three private subnets in your VPC into which you can launch your AWS resources such as Amazon EC2 instances.
Learn more
To learn more about Amazon VPC and watch how to create a VPC and public and private subnets, please check out this video from our YouTube channel:
Some useful references:
- How Amazon VPC works
- IP addressing for your VPCs and subnets
- Classless Inter-Domain Routing
- IP Subnet Calculator
Ready to Take Your Tech Career to the Next Level?
- On-Demand Training: Learn at your own pace and on your own schedule.
- Challenge Labs: Apply what you’ve learned in a real-world setting without the risk of incurring surprise cloud bills.
- Cloud Mastery Bootcamp: Build job-ready skills with this live, immersive training that can get you certified faster than you thought possible.