
AWS Lambda is a serverless compute service that lets you run your code in response to various events, while automatically managing the required compute resources. AWS Lambda allows you to develop and run applications and services without worrying about servers. In this tutorial, we will discuss how to create a Python function and deploy it in AWS Lambda. Before diving in, let’s ensure we have the necessary pre-requisites for following this tutorial.
Prerequisites for following this tutorial on how to deploy Python functions to AWS Lambda:
- An OpenWeatherMap API key.
- You will need to have Python installed on your computer to run the function.
- You will need to have the requests library installed. You can install it using pip by running the command pip install requests in your terminal or command prompt.
- An IDE or text editor like PyCharm, Visual Studio Code, or IDLE
Writing your Python function
This Python function displays the current weather of New York city in the USA
import requests
def get_current_temp():
# Replace YOUR_API_KEY with your own OpenWeatherMap API key
api_key = “Your API Key”
city = “New York”
state = “NY”
country = “US”
# Make the API call to OpenWeatherMap
url = f”http://api.openweathermap.org/data/2.5/weather?q=,,&appid=&units=imperial”
response = requests.get(url)
# Parse the temperature from the API response and print it
if response.status_code == 200:
weather_data = response.json()
current_temp = weather_data[‘main’][‘temp’]
print(f”The current temperature in , , is degrees Fahrenheit.”)
else:
print(“Error: Unable to retrieve current temperature.”)
Function Overview
This function uses the OpenWeatherMap API to retrieve the current temperature in New York, United States. Here is a summary of the what this function does:
- The function begins by importing the requests library, which is used to make the API call to OpenWeatherMap.
- Specifies the purpose: The get_current_temp() function retrieves the current temperature in New York, United States with no arguments.
- The function sets several variables, including the OpenWeatherMap API key and the location from which to retrieve the temperature (in this case, New York, NY, US).
- The function constructs a URL string containing the location and API key, then uses the requests library to make an API call to OpenWeatherMap.
- The function then extracts the current temperature in Fahrenheit from the API response, which is in JSON format.
- Prints the temperature: Finally, the function prints the current temperature in Fahrenheit along with the city, state, and country to the console in a user-friendly format.
How to test the function locally
Running the function locally is easy. Just follow these simple steps:
- Create a new file in Python: Create a new Python file on your local machine, and copy the get_current_temp() function in it.
- Replace the API key: Replace the placeholder YOUR_API_KEY with your own OpenWeatherMap API key.
- Save your work: Save the file with a name you can easily recall, such as test-weather.py.
- Open a terminal: On your local machine, open a terminal or command prompt.
- Proceed to the directory: Navigate to the directory in which the test_weather.py file was saved.
- Start the file: Use the command Python test_weather.py to execute the file.
- Verify the output: If the function executed properly and the API call was successful, the current temperature in New York, United States should be displayed on the console.
- This version of the function uses f-strings to construct the URL with the correct parameter values
You will need a valid internet connection for this test to function, as the function makes an API call to OpenWeatherMap to retrieve the weather data. In addition, if the API call fails for any reason (for instance, if the API key is invalid), the function will display an error message rather than the temperature.
Packaging your function
Packaging a Python function provides immense benefits such as:
- Reusability: A function packaged as a module can be reused across projects without copying and pasting code. Using the same code in several locations can save time and reduce errors.
- Modularity: Packaging functions as modules makes code more modular, reusable, and easier to maintain and update.
- Distribution: Python packages make it easier to share code publicly or internally. This encourages code reuse and collaboration.
- Dependency management: When packaging a function as a Python package, you can identify its dependencies, making it easier to manage dependencies across projects.
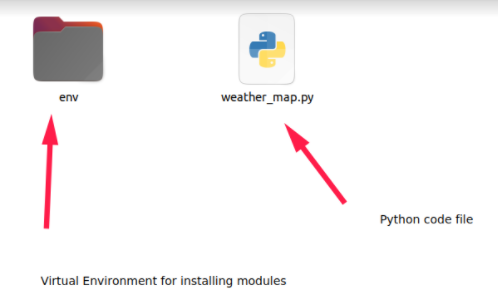
Creating a directory for the function and dependencies
Here is a structure of the folder and the placement of files for this project.
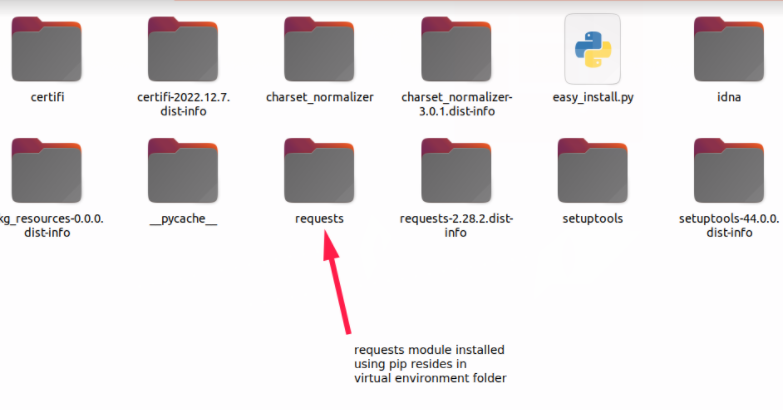
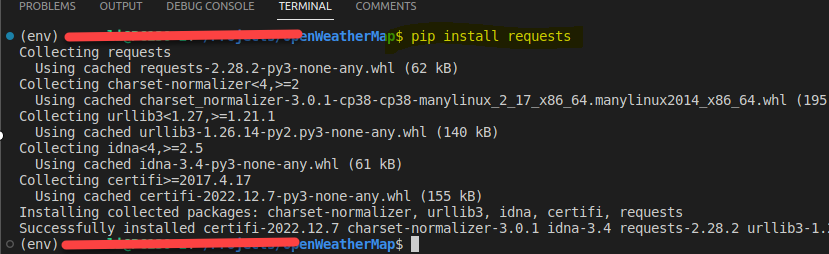
Installing dependencies with pip
The below screenshot shows the installation of dependencies for this project:
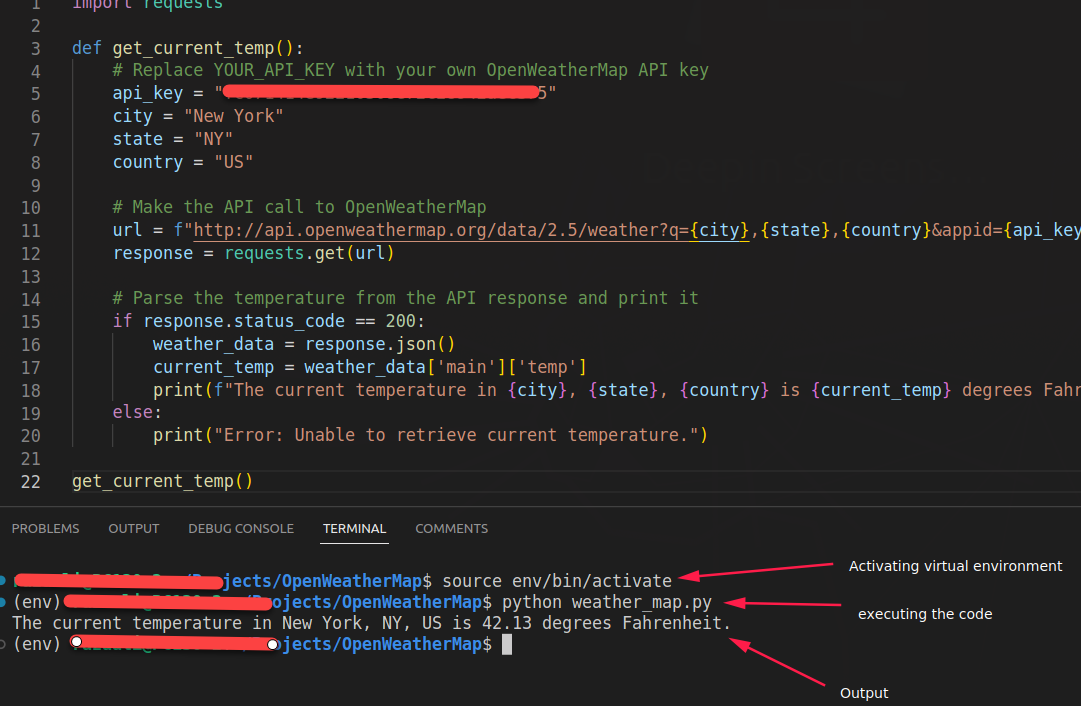
Executing the function locally
As you can see from below screenshot, we called the method at the end of the Python file and executed it in the IDE. The terminal shows the result of the execution. You can see the temperature being shown correctly in the console. Note that unlike AWS Lambda, the method get_current_temp() does not take any parameter in the method definition.
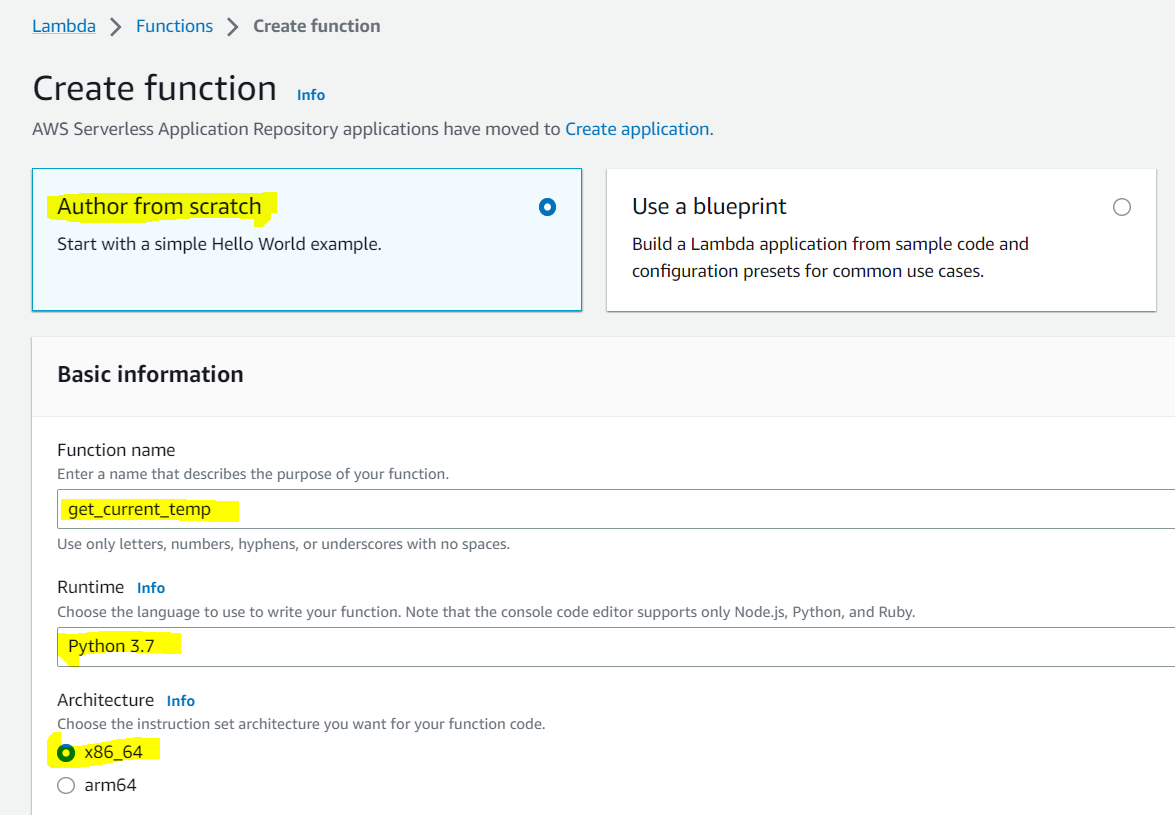
Creating an AWS Lambda function
- Navigate to the AWS Management Console.
2. Click the “Create function” button.
3. Choose “Author from scratch” and select a name for the function.
4. Choose Python 3.7 runtime
- Enter the function name.
- Select the Python runtime which is 3.7 in this case.
- Choose the architecture x86_64 in this example.
Uploading your function code
- Upload the ZIP file of the function and dependencies
There are many ways to upload your function to AWS Lambda. One way is to upload the code through a zip file. Note that any code dependencies like requires libraries should also be part of the zip.

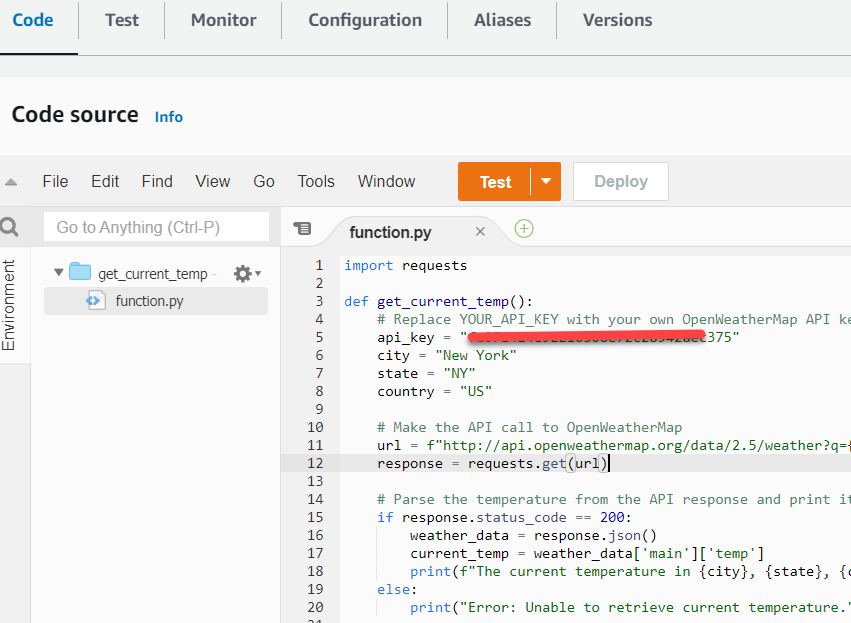
You can directly add/edit the Python code in the Lambda console as shown below:
2. Set the “Handler” field to the name of the Python file and the function
The screenshot below shows how to set the handler field name in AWS Lambda.
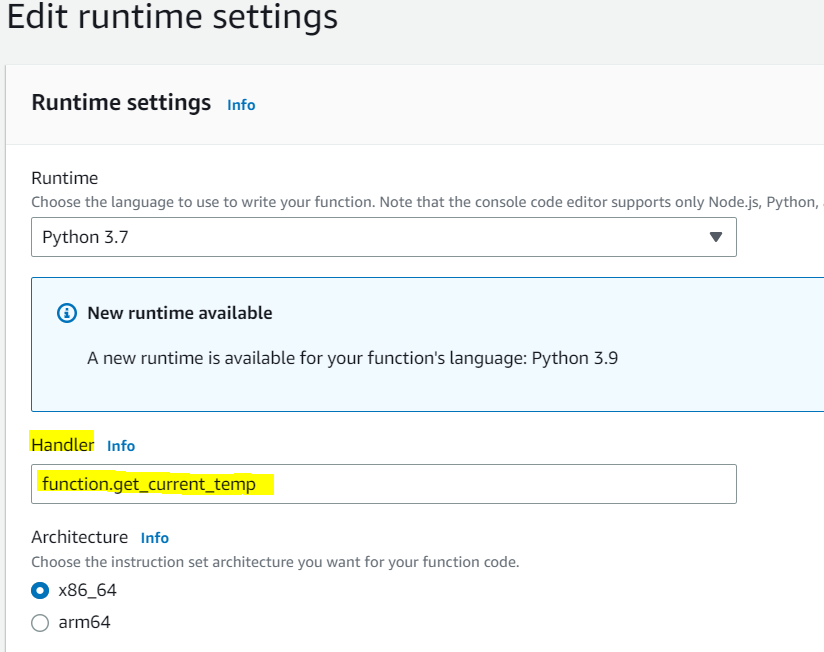
What the “Handler” field does
By setting the handler parameter on your function’s settings, you may indicate to the Lambda runtime the handler method to invoke.
The value of the handler setting when configuring a function in Python is the file name and the name of the handler module, separated by a dot. main.Handler, for example, invokes the Handler method defined in main.py. In our example, the file name is function and method name is get_current_temp
Testing your function
Using the AWS Lambda console to test your function in AWS Lambda
Let’s start with creating a test event in Lambda.
How to create a test event
When testing a Lambda function in the AWS Management Console, you can simulate the data passed to the function by a trigger by providing an event input.
Follow these steps to provide an event input when testing the function:
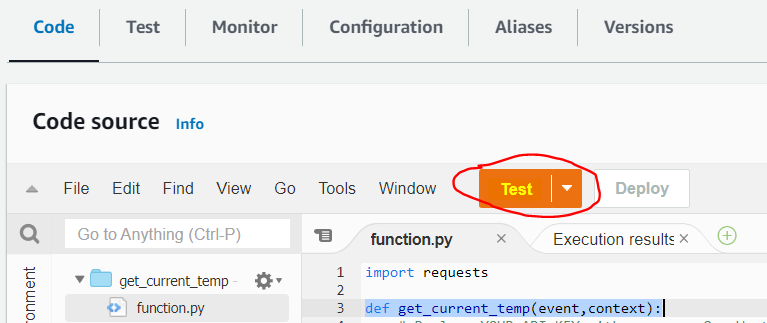
- In AWS Lambda, select the desired function from the list of functions.
- Select the “Test” button in the code section of the function as shown below
3. On the screen of “Configure test event” enter the information as shown below:
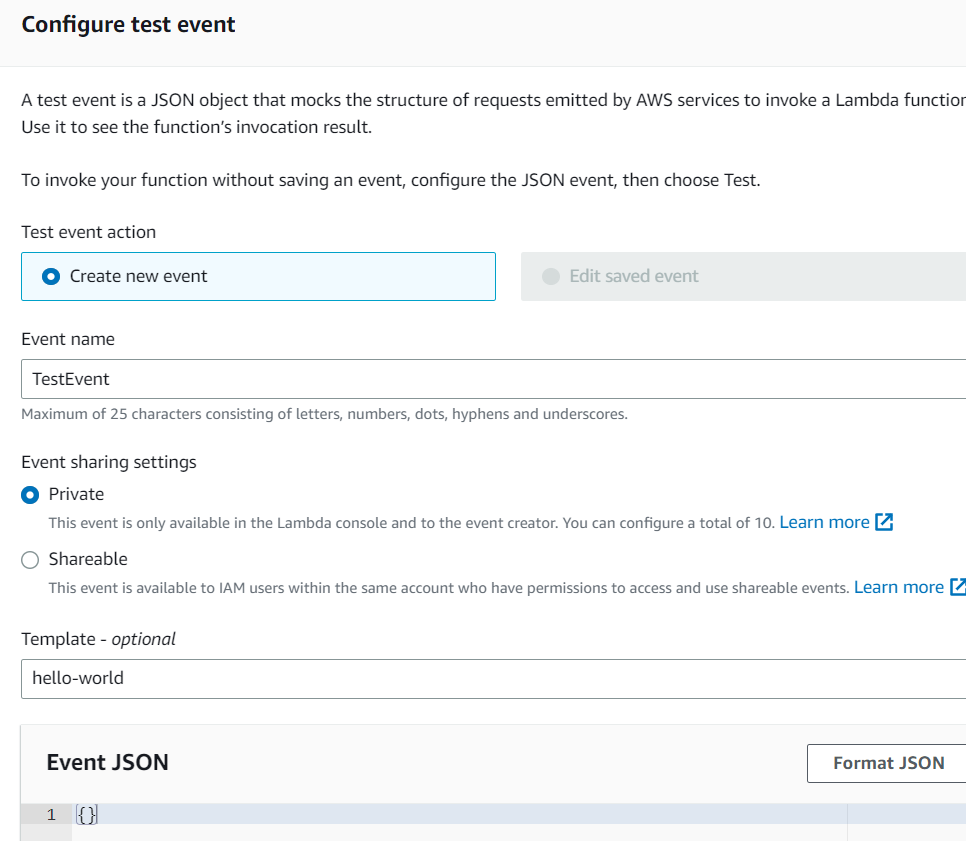
4. In the “Event name” field, enter the event’s name e.g. TestEvent
5. Enter a JSON-formatted payload containing any required function parameters in the “Event body” field. Here is an example of usable event data:{}
6. Click on the “Create” button to create the test event.
7. Click the “Test” button to run your code using the event you just created. The Lambda function will be triggered with the event data you provided, and you can view the output in the console.
8. Their difference between local testing and testing on AWS lambda is that with local testing, you would not pass any parameters to the python method because there are no input parameters to receive. However, when testing on AWS lambda, you need to specifically add two parameters (event and context) to the definition of your python method.
You do not need to send these two parameters when calling this function, AWS lambda will automatically send these two parameters.
def get_current_temp(event,context):
Demonstration of how to view the function’s output
After you click the test button to execute the function, you can see the output of the function in the “Execution result” section as demonstrated below:
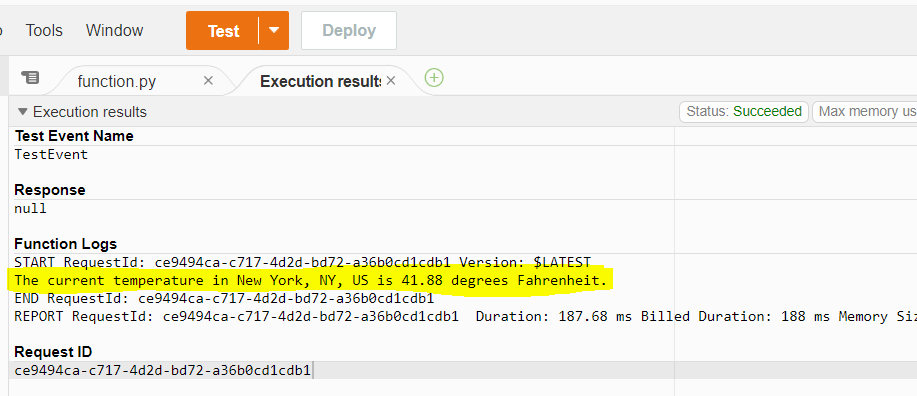
You can see the highlighted line in yellow which actually prints the current temperature of New York City.
Summary of the benefits of deploying Python functions to AWS Lambda
AWS Lambda is function as a service (FaaS). It offers many benefits including:
- Cost-effective: AWS Lambda runs code without servers. It’s pay-per-use. Memory selection affects virtual CPU and cost.
- Scalable: Your application can scale AWS Lambda up or down. It’s built for high traffic and availability.
- Simplicity: AWS Lambda’s setup is simple. It can be triggered by over 200 AWS and SaaS services and used for almost any application or backend service.
- Security: AWS Lambda runs code securely. It handles high traffic and is highly available.
- Flexibility: AWS Lambda can process data and run web applications. It can be triggered by over 200+ AWS and SaaS services and used for almost any application or backend service.
Conclusion
In this article, we discussed how to create and deploy Python functions to AWS Lambda. We went through different steps to deploy and test the method in an AWS Lambda environment. We also covered how to test the Python functions in a local environment.
Ready to Take Your Tech Career to the Next Level?
At Digital Cloud Training, we’re dedicated to your success. Our courses offer up-to-date content, equipping you with the expertise to stand out in the competitive tech job market.
Our On-Demand Training allows you to learn at your own pace, fitting seamlessly into your schedule. Dive into the world of cloud computing whenever and wherever suits you best.
But we don’t stop at theory. Our Challenge Labs provide practical, real-world scenarios where you can apply your newfound knowledge without the risk of unexpected cloud costs. Gain hands-on experience and sharpen your skills.
For those seeking an immersive experience, our Cloud Mastery Bootcamp delivers live, job-ready training. Led by industry experts, this accelerated program can get you certified faster than you thought possible.
It’s time to propel your tech career forward. Join us at Digital Cloud Training and unlock your full potential in the world of cloud computing.