One of the main challenges when learning Cloud Computing is to build hands-on experience. When learning only the theory, one may end up struggling when it comes to implementing cloud solutions in the real world. That’s why here at Digital Cloud Training we have a strong focus on hands on lessons throughout the video courses we provide for AWS Certifications.
Recently, we decided to take this to another level, by introducing AWS Bootcamps. We currently offer two bootcamps which are aligned with two certifications (AWS Certified Cloud Practitioner and AWS Certified Solutions Architect Associate). With these bootcamps, you not only develop the fundamental cloud skills you need to pass the AWS exam, but also learn how to build real-life, scalable and highly complex applications with a broad range of AWS Services. Let’s explore how you could benefit from joining an AWS Bootcamp.
Advantages of joining a Bootcamp
Sense of community
When participating in an AWS Bootcamp with Digital Cloud Training, you get to be surrounded by like minded individuals – all aspiring to get into the cloud or level up their cloud career. You will be able to network, share tips and build a group of people who you can help inspire – and be inspired by.
Career tips
Career preparedness sessions play an important part in our bootcamps. You get tailored advice on how to kick-start your cloud career in AWS. Learn from industry experts who can give advice on how to get your CV to the top of the pile and how to network effectively on LinkedIn. These hacks will put you in a better position to find employment in the Cloud.
Step-by-step guidance
With a structured training plan, there is no guess work in what steps to take on your way to success. A blend of self-paced video courses, virtual lab exercises paired with multiple live interactive sessions every week will help you develop experience and gain confidence. This is a perfect opportunity for those who are unsure of how to start your cloud journey.
One-on-one assistance
Bootcamp members enjoy one-on-one sessions with cloud experts whom they can ask anything from how to find a job, technical questions, etc. They get direct support and advice from people who currently work in the AWS cloud.
A realistic path to employment
The perpetual dilemma of landing a job which requires experience – whilst you have no experience – can be difficult to get past. Our hands-on bootcamp will give you the skills and knowledge needed to build scalable and realistic solutions on the cloud, using our live labs and real-world projects.
So without further ado, here is a taster of a lab lesson which our students built in a live communal environment in one of our most recent AWS Solutions Architect Associate Bootcamps.
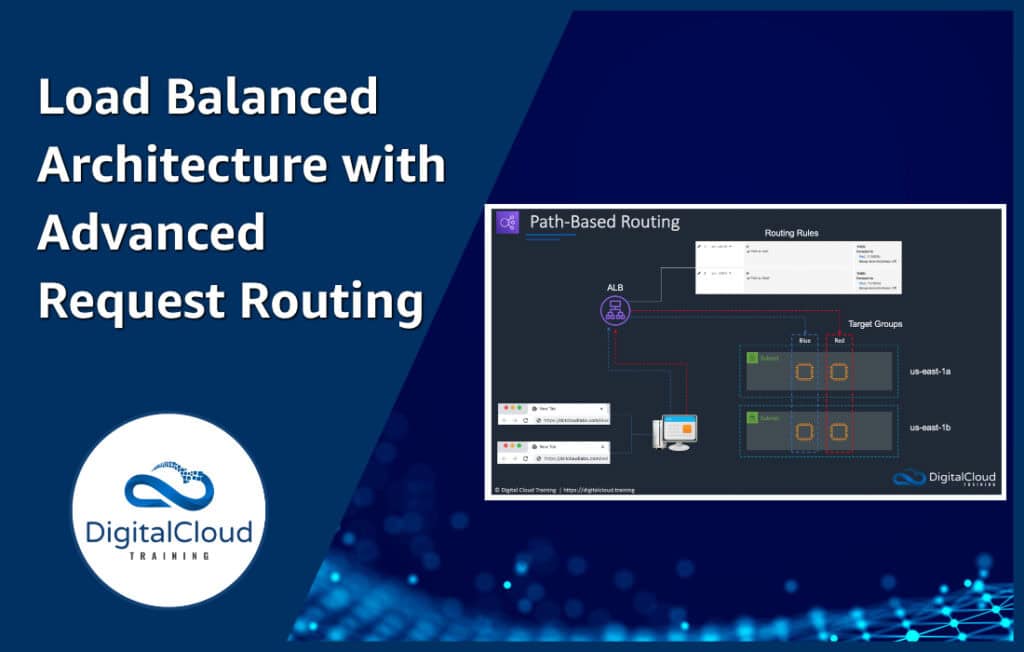
Load Balanced Architecture with Advanced Request Routing
This lab guide from our Cloud Mastery Bootcamp, creates a simple website, hosted on EC2, behind an Application Load Balancer. Host-based and path-based routing rules will then be configured to route based on information in the host header or URL path.
Host-based routing allows you to route to multiple domains on a single load balancer by routing to a different set of EC2 instances or containers based on information in the host header.
Path-based routing is also referred to as URL-based routing. The Application load Balancer will forward the requests to the specific targets based on the rules configured on the load balancer.
Requirements (Prerequisites)
- AWS Free Tier Account
- Basic Exposure to the AWS Console
- Follow the steps in Section 8 of the AWS Solutions Architect video course to register your own domain name in Route 53
Resources
Download the “code-advanced-request-routing.zip” file.
Exercise Overview
Exercise 1 – Create the Red and Blue EC2 instances
Exercise 2 – Enable Path-based Routing
Exercise 3 – Enable Host-based Routing
Exercise 4 – Clean up your resources
Exercise 1 – Create the Red and Blue EC2 instances
Task 1 – Create the S3 Bucket and Upload the code
The first step is to upload the code we will use to create the websites into an S3 bucket.
- Go to the S3 console and click ‘Create Bucket’.
- We will call out bucket ‘advanced-request-routing-123456’ with the numbers at the end being random to make the bucket globally unique. Take a note of the bucket name as will be referring to it again shortly.
- Scroll down and click ‘Create Bucket’.
- Locate the files we have downloaded as part of the course and select all files except the user data files and bucket-permissions file and upload them to the bucket.
Task 2 – Create your Security Group
The second step is to pre-emptively create the Security Group for your EC2 instances.
- Go to the EC2 console, scroll down to the ‘Security Group’ column under ‘Network Security’. Click ‘Create Security Group’. We will call it ‘WebsiteSG’. Populate the description field with ‘WebsiteSG’ also.
- Under inbound rules – simply add one rule:
- This is an HTTP rule, with an ‘Anywhere IPv4’ source. Create the Security Group.
Task 3 – Create the Red EC2 instance.
We will now launch the ‘Red’ EC2 instance and check to see if it has successfully retrieved the code from S3.
- Head over to the EC2 console and select ‘Launch Instance’.
- Call your first instance ‘Red’.
- Select the AMI, and under ‘Instance type’, select ‘t2.micro’.
- For ‘Key pair’, leave the default setting ‘Proceed without a key pair’.
- Under ‘Network settings’ select the security group you created earlier and choose the subnet us-east-1a.
- Expand ‘Advanced Details’ and under ‘IAM instance profile’ select ‘Create a new IAM profile.’
- A new page will open. Click ‘Create Role’.
- Under common use cases, select ‘EC2’ and click next.
- Click ‘Create Policy’ and move to the JSON section. Copy and paste the code from the bucket-permissions.json file into the code window, replacing the your-bucket-arn with the ARN of the bucket you have just made.
- Click review policy, and create policy, call it ‘mys3to3c2policy’.
- Go back to where we are creating the role, refresh the policies and find and select the policy we just created. Click next and call it ‘mys3to3c2role’.
- Go back to the launch instance page, and refresh the IAM instance profile, and locate the role, and click attach.
- Next, copy the user data from the ‘user-data-red’ file into the ‘User data’ field. It should look like the image below. You will also need to edit the name ‘dctlabs’ in the user data to the name of your S3 bucket.
- Create the instance.
- Follow the exact same steps to create the Blue instance with the blue user data (user-data-blue) and select subnet us-east-1b. You should then be able to get the public IP address from either instance and view the web pages created by each EC2 instance. You will need to add /blue and /red to the appropriate instance to return the custom web page.
Exercise 2 – Enable Path-based Routing
With path-based routing we will enter a path to our URL and the load balancer will route the request to the appropriate target group based on the rules we create.
Task 1 – Create your target groups
The first step is to set up the target groups; you need at least 2 target groups to configure path-based routing.
- To start things off, click on Target Groups under Load balancing.
- Click ‘Create target group.’
- Set up 2 target groups, one is called ‘Red’ which will contain the red targets, and the other is called ‘Blue’ and will contain the blue targets.
- Leave all the defaults, except changing the target group name to ‘Red’ / ‘Blue’ and change the health check to:
- For Red: /red/index.html
- For Blue: /blue/index.html
- Register the correct instance i.e., Red and be sure to click ‘include as pending below’.
Task 2 – Create your Application Load Balancer
The next step is to create the Application Load Balancer.
- On the left-hand side of the EC2 console, you will find the link for Load Balancers.
- Click ‘Create Load Balancer’ and choose the ‘Application Load Balancer’.
- Call the load balancer ‘LabLoadBalancer’ and leave the Scheme as Internet Facing.
- Select both us-east-1a and us-east-1b for the subnet mappings. This will allow routing of traffic across the instances in different AZs.
- Choose the same Security Group as earlier (WebsiteSG).
- Choose the listener and routing as HTTP: 80 and choose the Blue Target Group.
- Click Create load balancer and wait a few minutes for it to turn from ‘Provisioning’ to ‘Active’.
- Once active, under Listeners, select the first listener rule and click ‘View/Edit Rules’.
- Edit the paths.
Click the + sign on top and click ‘Insert Rule’ then select the Rule type as Path, enter /red*, select the target group ‘Red’ in the ‘Forward to’ column.
Click Save, insert another rule, and configure forwarding to the Blue target group too. - We can then test the load balancer’s path-based routing by copying the DNS name from the Application Load Balancer and append either /blue or /red on the URL and see what happens. You should see the different colored custom web pages we added to our instances.
Exercise 3 – Enable Host-based Routing
With host-based routing we will enter a subdomain to the domain name and the load balancer will route the request to the appropriate target group based on the rules we create.
Task 1 – Edit host-based forwarding rules
The first step is to set up the forwarding rules. You need at least 2 target groups to configure host-based routing.
- Click on the Load Balancer name and then go to the Listeners tab
- Click on ‘View/Edit rules’ under ‘Rules’ column.
- Remove the path-based routing rules created earlier.
- Click on the ‘+’ symbol followed by ‘Insert Rule’.
- Under the ‘IF(all match) column, click on the ‘+ Add condition’ drop-down arrow and select ‘Host header’ as the Rule type and put your domain name with the blue or red subdomains in front. For example, blue.dctcloudlabs.com and red.dctcloudlabs.com
- In the ‘Then’ column, click on ‘+Add action’ drop-down arrow and select ‘Forward to’ as the action. Here select the appropriate target group (Red / Blue).
- Make sure you repeat the above to have one rule for each target group / subdomain.
Task 2 – Configure Records in Route 53
In this task we need to create the relevant subdomain DNS records in Amazon Route 53 and configure the load balancer as the target.
- Open Route 53 dashboard from the management console, find your public domain name under hosted zones. Click on it and select ‘Create Record.’
- Enter various details for this record:
subdomain: blue or red
Record type: Select A type here.
Value/Route traffic to:
Select ‘Alias to Application and Classic Load Balancer’
Select region N.Virginia
Select the target load balancer we made earlier.
- Finally hit ‘Define simple record’.
- Make sure you repeat the above steps to ensure you have one DNS record for each of the blue and red subdomains.
- To check if everything is working as expected, open a web browser, and paste the DNS name of the load balancer and append it with either Red or Blue, like this:
red.mydomainname.com/red
blue.mydomainname.com/blue
You should see the webpages load and be populated with content. Bear in mind that the custom web pages exist under the /blue and /red paths, so you’ll need to add those to see that the correct pages are loading.
Exercise 4 – Clean up your resources
Task 1 – Delete your resources
You can now delete the resources you created:
- Application Load Balancer (chargeable).
- Target groups (not chargeable).
- Security Group (not chargeable).
- Amazon EC2 Instances (chargeable).
- Amazon S3 bucket (chargeable).
- Amazon Route 53 Alias records (not chargeable).
Become an AWS expert with our value-packed training
AWS Training – Our popular AWS training will maximize your chances of passing your AWS certification the first time.
Membership – For unlimited access to our entire cloud training catalog, enroll in our monthly or annual membership program.
Challenge Labs – Build hands-on cloud skills in a secure sandbox environment. Learn, build, test and fail forward without risking unexpected cloud bills.