
When building resources in the AWS Cloud, there is a temptation to simply dive into the console and start launching services manually. Whilst this is an obvious choice for testing how things work (or getting more familiar with the console) – when building an enterprise infrastructure using multiple environments, with multiple business units – you would be best placed automating the deployment of your infrastructure using a service like CloudFormation.
What is CloudFormation?
CloudFormation is an Infrastructure as Code (IaC) service within AWS. Infrastructure as Code is a way of building your architecture using a particular coding language where you deploy your applications using code written in either JSON or YAML. With IaC you can speed up your resource deployment, and CloudFormation will provision your resources in a safe, repeatable manner, allowing you to build and rebuild your infrastructure and applications without having to perform manual actions or risk misconfiguring something.
When writing CloudFormation templates you can use either YAML or JSON as your language of choice. Today, we’re going to show you how to deploy a VPC, with some simple resources and explain each step of the way. We’ll write the individual parts of the template in YAML throughout the blog post. The full code is available to download on GitHub.
We’ll create the following resources
- A VPC with a CIDR Block range of 10.0.0.0/16
- An Internet Gateway
- 2 Public Subnets
- 2 Private Subnets
- Route tables for the Subnets
- A Security Group for a Web Server
- An EC2 Instance
We will also display the output of the public IP address of the web server in our Outputs section. Let’s start on the VPC initially in YAML:
Resources:
VPC:

Type: AWS::EC2::VPC

Properties:

CidrBlock: 10.0.0.0/16

EnableDnsSupport: true

EnableDnsHostnames: true

Tags:

- Key: Name

Value: VPC Blog Post
Here, we’re giving the VPC a name Cidr Block range of 10.0.0.0./16 – and supporting DNS and enabling DNS hostnames also. The name given is VPC Blog Post and this first section is creating the VPC itself. Next, let’s make the Internet Gateway and attach it to the VPC.
InternetGateway:

Type: AWS::EC2::InternetGateway

Properties:

Tags:

- Key: Name

Value: VPC Blog Post

InternetGatewayAttachment:

Type: AWS::EC2::VPCGatewayAttachment

Properties:

InternetGatewayId: !Ref InternetGateway

VpcId: !Ref VPC
We’ve deployed the Internet Gateway with the name VPC Blog Post, and simply attached it to the previously created VPC. The VpcId: !Ref means that we’re referring to the name ‘VPC’ for the VPC we created as part of this CloudFormation Stack.
Now we have a shell of a VPC and an IGW that is attached. Next, we need to add the first of two Public Subnets.
Let’s break this further down as there is some complexity here.
For PublicSubnet1, the template is simply creating a subnet, and the properties come later.
We are mapping this to the previously created VPC using the Ref function again, and we are choosing the first AZ in the list of AZs in the Region when using this Select function to select our AZ. If you wanted to choose a specific AZ, you would list the AZ instead. Thirdly, we assign a CIDR block range to the Subnet (a Subset of the VPC CIDR) of 10.0.1.0/24 – which gives us 256 IPV4 addresses for this subnet.
The ‘MapPublicIpOnLaunch’ property assigns a public IP on launch – giving us a public host to work with. We are finally implementing a tag called ‘VPC CloudFormation Public Subnet 1’ – although you can choose to call it whatever you like.
When it comes to the other Public and Private subnets, they are mostly similar. However there are a few differences.
For the second subnet, PublicSubnet2, the only differences between the first and the second are AZs and the CIDR block. We have chosen the second AZ in the Region to allow a Public and a Private Subnet per AZ – and on the Private subnets we have set the MapPublicIpOnLaunch property as false. We do not want or need a public IP assigned to any instances launched in our private Subnets.
PublicSubnet1:

Type: AWS::EC2::Subnet

Properties:

VpcId: !Ref VPC

AvailabilityZone: !Select [ 0, !GetAZs '' ]

CidrBlock: 10.0.1.0/24

MapPublicIpOnLaunch: true

Tags:

- Key: Name

Value: VPC Blog Post Public Subnet 1

PublicSubnet2:

Type: AWS::EC2::Subnet

Properties:

VpcId: !Ref VPC

AvailabilityZone: !Select [ 1, !GetAZs  '' ]

CidrBlock: 10.0.2.0/24

MapPublicIpOnLaunch: true

Tags:

- Key: Name

Value: VPC Blog Post Public Subnet 2

PrivateSubnet1:

Type: AWS::EC2::Subnet

Properties:

VpcId: !Ref VPC

AvailabilityZone: !Select [ 0, !GetAZs  '' ]

CidrBlock: 10.0.11.0/24

MapPublicIpOnLaunch: false

Tags:

- Key: Name

Value: VPC Blog Post Private Subnet 1

PrivateSubnet2:

Type: AWS::EC2::Subnet

Properties:

VpcId: !Ref VPC

AvailabilityZone: !Select [ 1, !GetAZs  '' ]

CidrBlock: 10.0.12.0/24

MapPublicIpOnLaunch: false

Tags:

- Key: Name

Value: VPC Blog Post Private Subnet 2
So now we have the VPC, the Internet Gateway, two public and two private subnets. Next, we need route table for the Public subnets to use.
We need to create a route to the Internet Gateway, as part of the VPC we have made and we also need to associate the two public subnets to the route table.
PublicRouteTable:

Type: AWS::EC2::RouteTable

Properties:

VpcId: !Ref VPC

Tags:

- Key: Name

Value: VPC Blog Public Routes

DefaultPublicRoute:

Type: AWS::EC2::Route

DependsOn: InternetGatewayAttachment

Properties:

RouteTableId: !Ref PublicRouteTable

DestinationCidrBlock: 0.0.0.0/0

GatewayId: !Ref InternetGateway

PublicSubnet1RouteTableAssociation:

Type: AWS::EC2::SubnetRouteTableAssociation

Properties:

RouteTableId: !Ref PublicRouteTable

SubnetId: !Ref PublicSubnet1

PublicSubnet2RouteTableAssociation:

Type: AWS::EC2::SubnetRouteTableAssociation

Properties:

RouteTableId: !Ref PublicRouteTable

SubnetId: !Ref PublicSubnet2
You can see the first step was making the route table. We then made a route that we called ‘DefaultPublicRoute’ and allowed all traffic (0.0.0.0/0) to the IGW using the !Ref function again. We then associated the two Public Subnets using the ‘AWS::EC2::SubnetRouteTableAssociation’ line, and then associated a route table ID and a Subnet ID to connect the two together.
Next, we need to create a Web Server Security group which will allow all HTTP traffic on port 80.
WebServerSecurityGroup:

Type: 'AWS::EC2::SecurityGroup'

Properties:

GroupDescription: Web Server Traffic

SecurityGroupIngress:

- IpProtocol: tcp

FromPort: '80'

ToPort: '80'

CidrIp: 0.0.0.0/0

VpcId: !Ref VPC
The description shows that we are allowing Web Server Traffic. As Security Groups are Stateful firewalls, we only need to write a set of inbound rules, which use the TCP protocol, over port 80 (HTTP) and allow all traffic.
We now have all of the infrastructure ready to launch our Web Server. We will be launching an Amazon Linux 2 AMI, using a t2.micro instance in the us-east-1 Region. We will also include some User Data which will run an update, install an Apache web server and create a simple web page for us to see.
EC2Instance:

Type: AWS::EC2::Instance

Properties:

ImageId: ami-0e1d30f2c40c4c701

InstanceType: t2.micro

SubnetId: !Ref PublicSubnet1

SecurityGroupIds:

- !Ref WebServerSecurityGroup

Tags:

- Key: Name

Value: VPC Blog Post EC2

UserData:

Fn::Base64: |

#!/bin/bash

yum install httpd -y

service httpd start

echo "<html><body><h1>Hello from DCT!<h1></body></html>" > /var/www/html/index.html
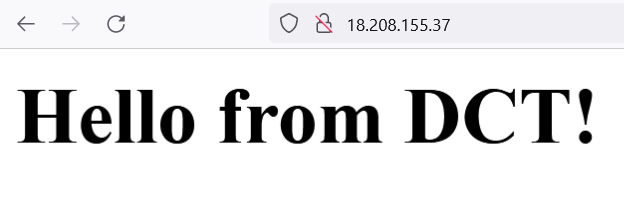
The user data echoes a message on the screen saying ‘Hello from DCT’!
Finally we included Output, which will allow us to grab the IP from our Web Server and visit the web page.
Now it is time to launch! Download the file from the GitHub above, and head over to the CloudFormation console. Click Create Stack, upload the YAML / JSON you have downloaded from GitHub, and click next.
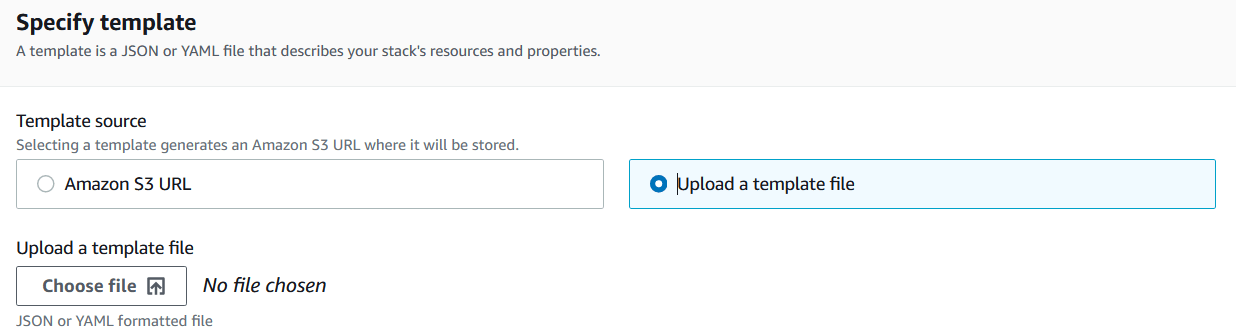
Call the Stack ‘VPC’ and ‘click next’ again.
You can accept the defaults for the next two pages, ‘click next’ twice and click ‘Launch Stack’.
Now the stack is being created.
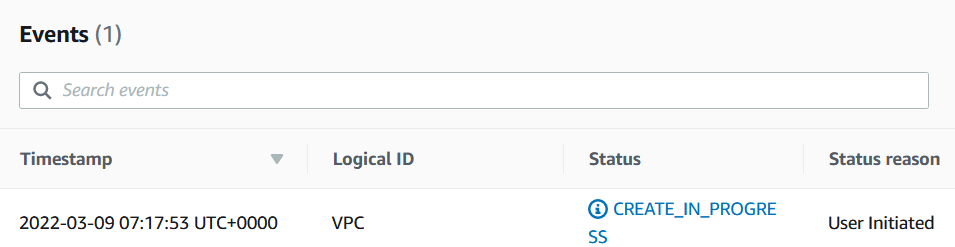
If you go to the resources tab you will see different items we have provisioned being made in the console.
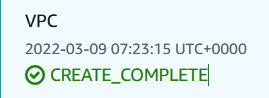
After a few minutes, you will see that your VPC is completed!
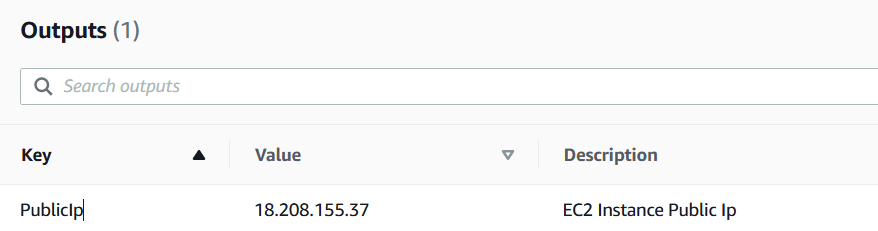
When navigating to the Outputs section, you will find one output which is the IP of your Web Server you have deployed.
When you copy and paste this IP address in to your browser, you should see the following message pop up.
If you look around your VPC console, you will find everything we have created as part of the CloudFormation template.
Now, it’s time to delete our Stack. When deleting the stack, it will delete all of the resources within the stack too.
Learn how to Master AWS Cloud
AWS Training – Our popular AWS training will maximize your chances of passing your AWS certification the first time.
Membership – For unlimited access to our cloud training catalog, enroll in our monthly or annual membership program.
Challenge Labs – Build hands-on cloud skills in a secure sandbox environment. Learn, build, test and fail forward without risking unexpected cloud bills.